Caring for a lawn can seem daunting for beginners, but with the proper guidance, anyone can transform their yard into a lush, green oasis. Many new homeowners or gardening enthusiasts ask, “How do I take care of a lawn?” and “What are the essential lawn care steps?” Understanding the basics of lawn care maintenance is crucial for achieving a healthy, vibrant yard.
Most people face the issue of the overwhelming amount of information and the seemingly endless tasks involved in lawn care. From mowing and watering to fertilizing and pest control, it’s easy to feel lost without a clear plan. However, maintaining your yard can become a manageable and enjoyable routine with proper lawn care instructions and a well-structured schedule.
This guide will break down the essential lawn care steps and provide detailed instructions on maintaining a yard effectively. By following this comprehensive lawn care guide, you’ll be well-equipped to keep your lawn looking its best all year round.
You will find out:
- How to select the suitable grass variety
- How to conduct a soil test
- How to accurately measure your lawn space
- How to grade your lawn for proper drainage
- The steps to prepare the soil for each grass type
- Step-by-step guide to sod installation
- Common pests and diseases
- Details on Irrigation schedules, weed control, fertilizing, and how to prepare your lawn for seasonal changes
Before You Plant – Planning and Choosing the Right Grass for Your Lawn
The Importance of Planning Before Planting
Effective planning involves evaluating several factors, including local climate, soil type, sunlight exposure, and lawn use. Understanding these elements helps you select the most suitable grass variety and develop a tailored care plan. Skipping this step can lead to poor grass growth, increased maintenance, and frustration.
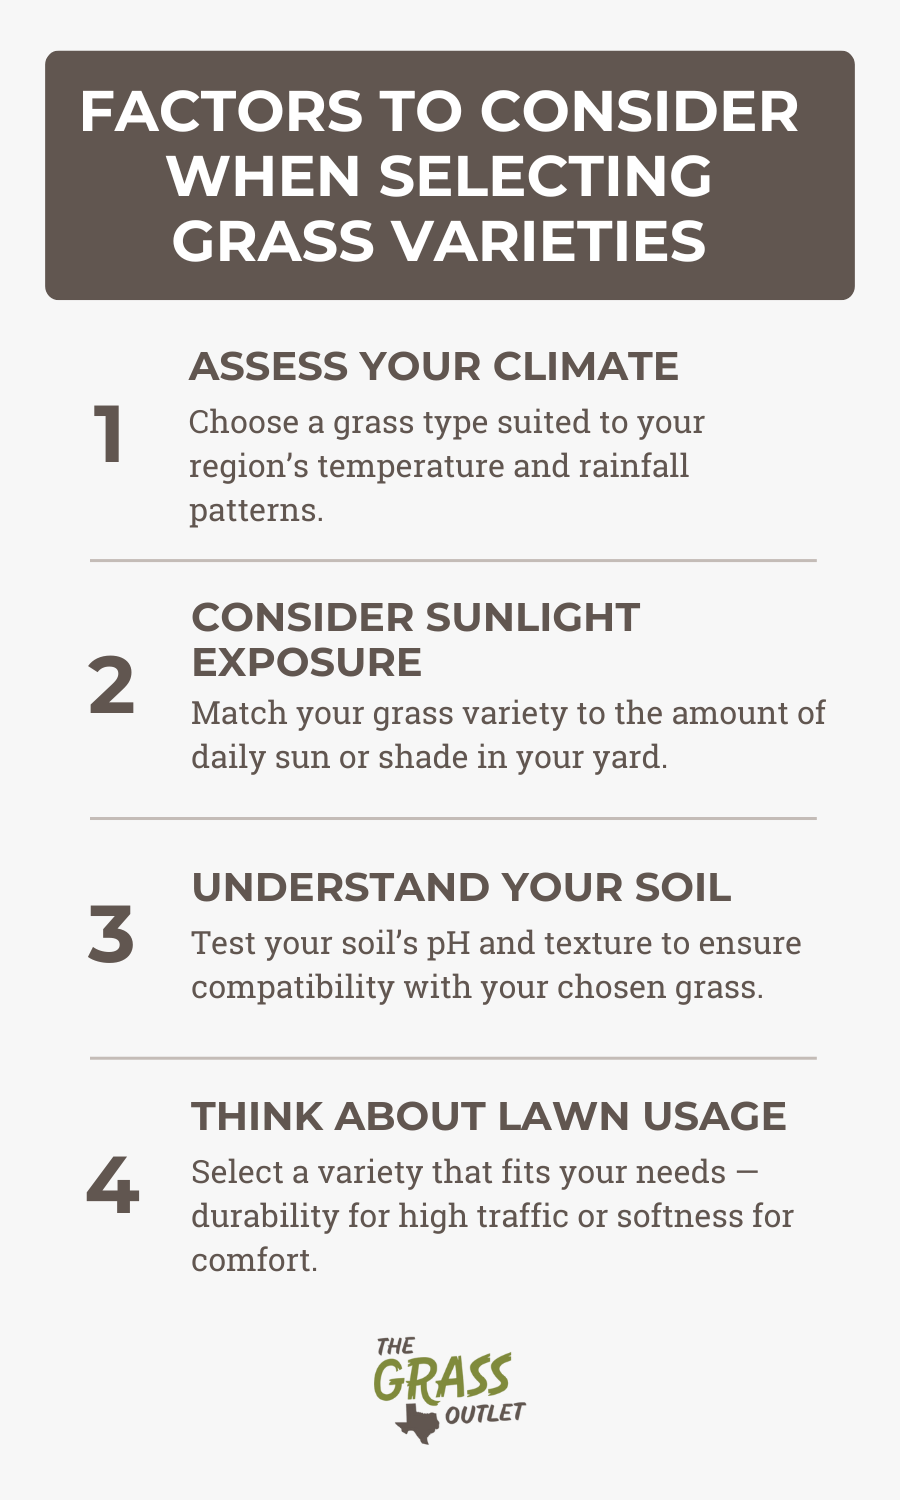
Tips on How to Select the Right Grass Variety
Choosing a suitable grass variety is essential for a thriving lawn. Here are some tips to guide you through the selection process:
- Assess Your Climate: Grass types are categorized into cool-season and warm-season grasses. Cool-season grasses thrive in regions with cooler temperatures. In contrast, warm-season grasses like Bermuda, Zoysia, and St. Augustine are better suited for warmer climates.
- Consider Sunlight Exposure: Different grasses have varying sunlight requirements. For example, some grasses, like St. Augustine and Zoysia, tolerate shade well, while others, such as Bermuda, need full sun to thrive. Evaluate how much sunlight your lawn receives throughout the day to make an informed choice.
- Understand Your Soil: Conduct a soil test to determine your soil’s pH and nutrient levels. Most grasses prefer slightly acidic to neutral soil (pH 6.0-7.0). Amend your soil as needed to create optimal growing conditions.
- Think About Lawn Usage: Consider how you intend to use your lawn. If you expect heavy foot traffic from kids and pets, choose a durable grass variety like Bermuda. For ornamental lawns, finer grasses like Zeon Zoysia may be more appropriate.
How to Choose the Right Grass for Different Environments and Needs
Selecting a suitable grass involves matching the grass type to your specific environmental conditions and intended use. Here are some common scenarios and the recommended grass types for each:
- High-Traffic Areas: For lawns that will endure frequent use, opt for durable grasses such as Bermuda. They can recover quickly from damage and handle wear and tear.
- Shady Areas: If your lawn has significant shade, choose grasses like Zoysia or St. Augustine, which perform well in low-light conditions.
- Drought-Prone Regions: Drought-tolerant grasses such as Zoysia and Bermuda are excellent choices in areas with water restrictions or low rainfall. These grasses require less water and can survive dry spells.
- Aesthetic Lawns: For a lawn that prioritizes appearance, fine-textured grasses like Zeon Zoysia or Bermudagrass create a lush, manicured look.
The Foundation of a Healthy Lawn: Soil Testing
The Role of Soil Quality in Grass Health
Soil quality is the cornerstone of a healthy lawn. It directly impacts the growth and vitality of your grass. Good soil provides essential nutrients, adequate drainage, and proper pH levels, crucial for robust grass development.
Poor soil conditions, on the other hand, can lead to weak, unhealthy lawns prone to disease, pests, and weed infestations. Ensuring optimal soil is the first step towards a lush, green lawn.
How to Conduct a Soil Test and Interpret the Results
A soil test is a straightforward process that yields valuable information about your soil’s health. Here’s a step-by-step guide on how to perform a soil test and interpret the results:
Collecting Samples:
-
- Use a clean, stainless steel, or plastic trowel to collect soil samples from different parts of your lawn. Avoid spots that have recently been fertilized or treated with chemicals.
- Dig 4 to 6 inches deep and take small samples from multiple locations for a comprehensive overview.
- Mix these samples in a clean bucket to create a composite sample.
Preparing and Sending Samples:
-
- Allow the soil mixture to air dry if it’s wet.
- Place 1 to 2 cups of the dry soil into a soil testing bag or a clean container.
- Send the sample to a soil laboratory or your local ag extension.
Interpreting the Results:
-
- Soil pH: Ideal soil pH for most grasses range from 6.0 to 7.0. If the pH is too low (acidic), add lime to raise it. If it’s too high (alkaline), use sulfur or ammonium sulfate to lower it.
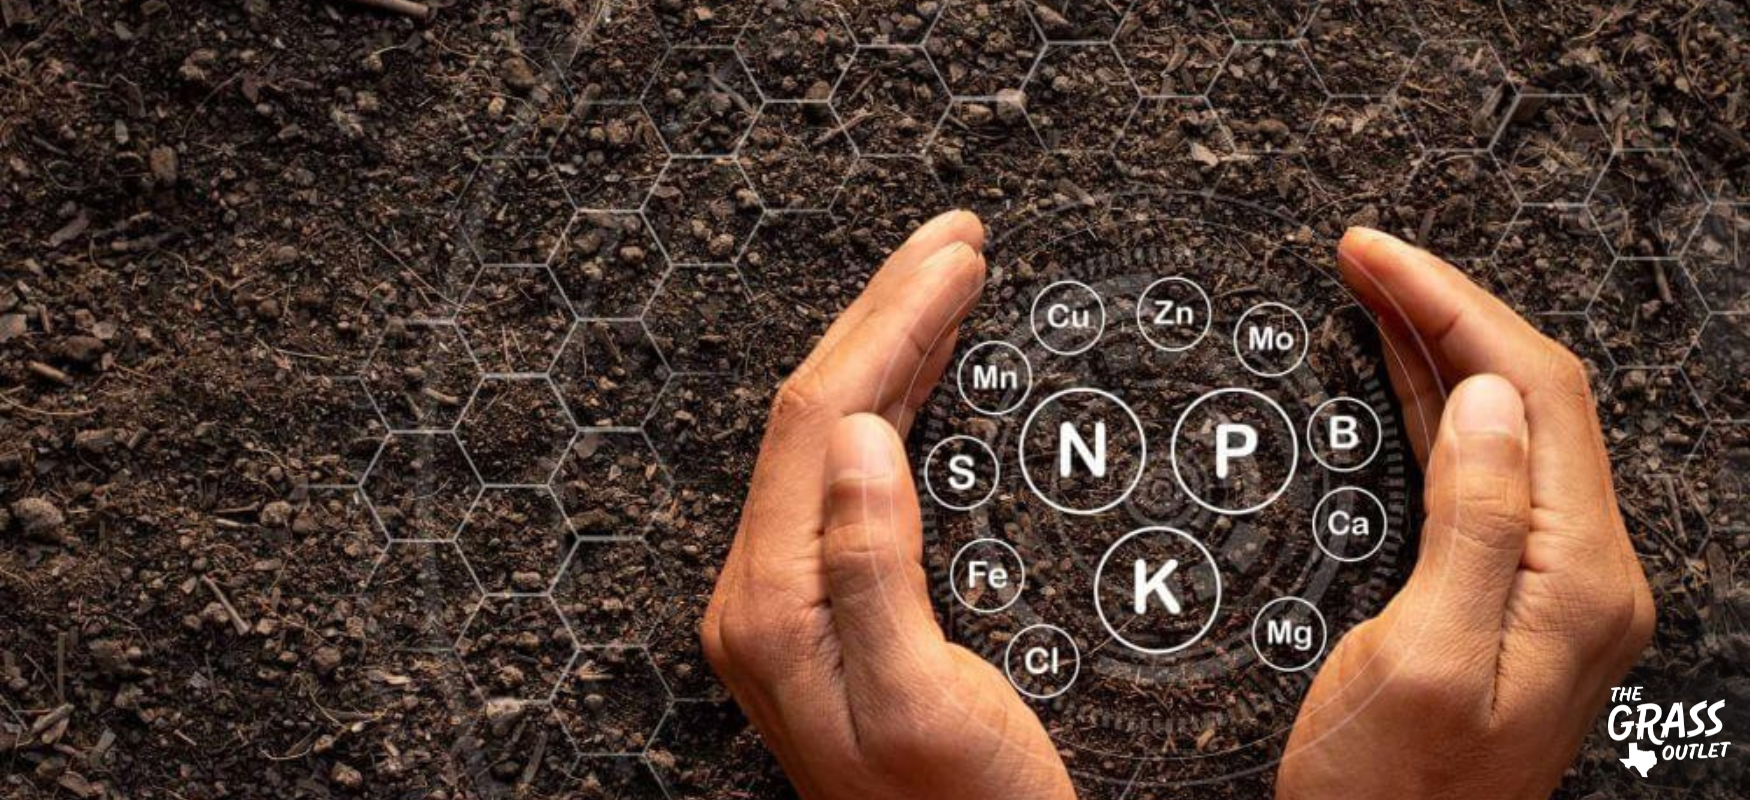
- Nutrient Levels: The results will show levels of nitrogen (N), phosphorus (P), and potassium (K). Use these readings to select the right fertilizer. For example, if nitrogen is low, apply a fertilizer high in nitrogen.
- Soil Texture: Understanding whether your soil is sandy, loamy, or clay helps determine water retention and drainage properties. Adjustments include adding organic matter to improve structure. Knowing this can also help determine your irrigation schedule.
Soil testing allows you to accurately address pH and nutrient imbalances, compaction and drainage issues, and overall soil ecosystem balance. Since sending your soil sample to a lab and receiving the results takes time, your first step should be ordering a soil testing kit so it’s ready when needed.
SoilKit.com is an excellent resource for soil testing. They typically offer a faster turnaround than local agricultural extensions, but it still may take a couple of weeks for the kit to be shipped both ways. Therefore, it’s practical to have the kit on hand, ready for sample collection and shipment once you complete your ground preparations.
Tailoring Soil Amendments for Zoysia, Bermuda, and St. Augustine Grasses
Different grass types have specific soil requirements. Here’s how to tailor soil amendments for Zoysia, Bermuda, and St. Augustine grasses:
Zoysia Grass:
-
- pH Preference: Slightly acidic to neutral (6.0-7.0)
- Nutrient Needs: Zoysia grass thrives with balanced nutrients but benefits mainly from regular nitrogen applications. Use a slow-release nitrogen fertilizer.
- Soil Texture: It prefers well-drained soils. If your soil is heavy clay, incorporate a sandy loam mix containing organic matter to improve drainage. Avoid adding sand to clay soil to avoid worsened compaction.
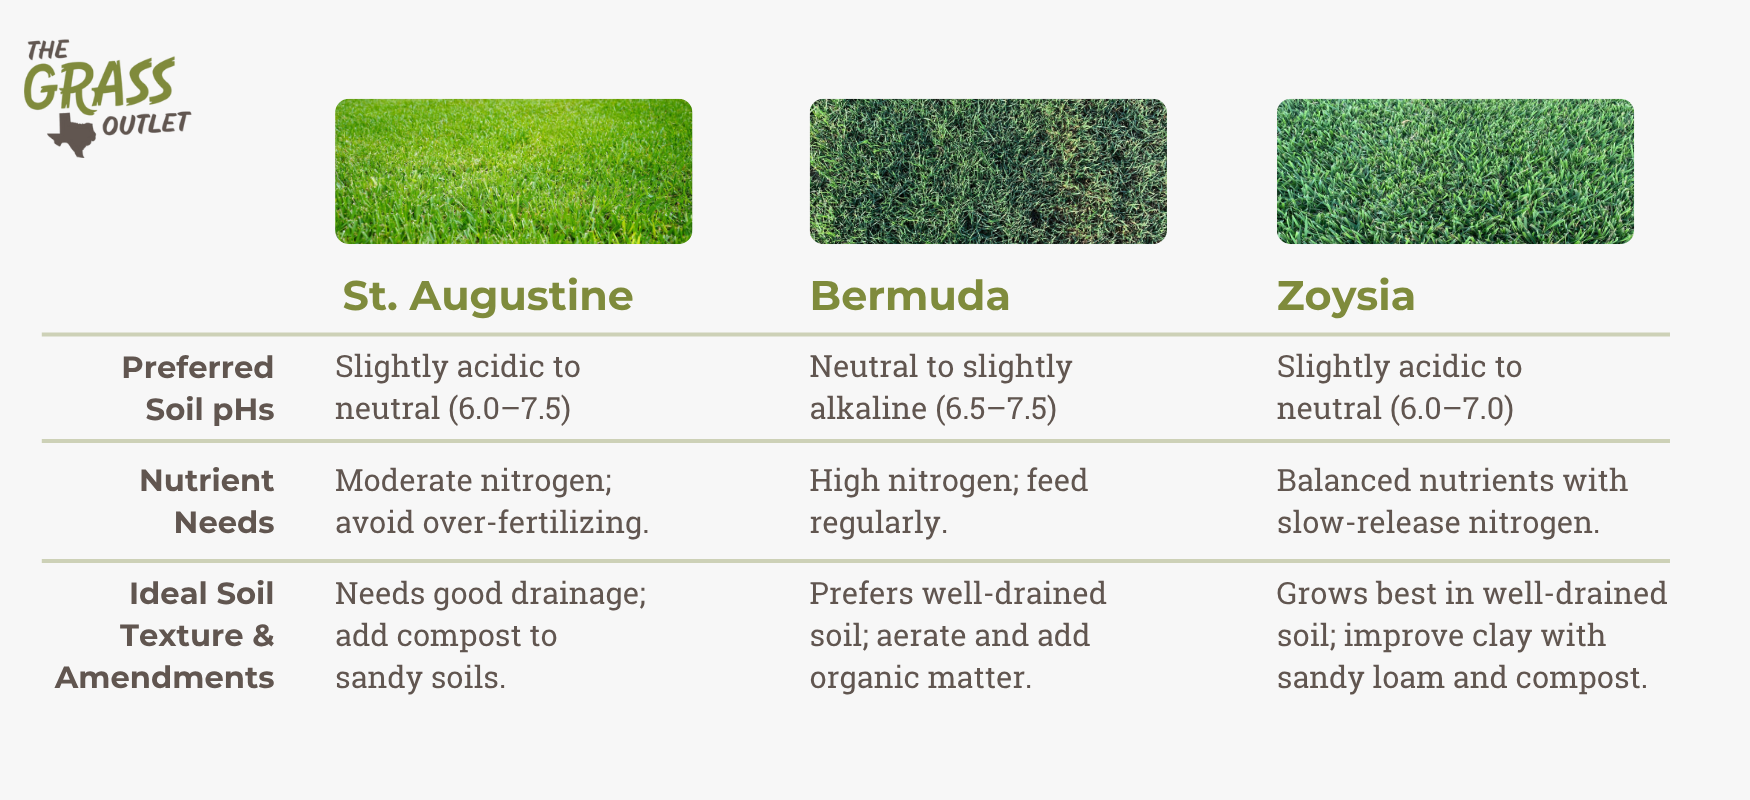
Bermuda Grass:
-
- pH Preference: Neutral to slightly alkaline (6.5-7.5)
- Nutrient Needs: Bermuda grass is a heavy feeder and requires high nitrogen levels. Apply nitrogen-rich fertilizer throughout the growing season.
- Soil Texture: Tolerates a range of soil types but grows best in well-drained soils. Aeration and organic matter can help improve compacted soils.
St. Augustine Grass:
-
- pH Preference: Slightly acidic to neutral (6.0-7.5)
- Nutrient Needs: This grass type prefers moderate nitrogen levels. Avoid over-fertilization as it can lead to thatch build-up and fungal lawn diseases.
- Soil Texture: Thrives in various soil types but needs good drainage. Improve sandy soils with organic matter to enhance nutrient retention.
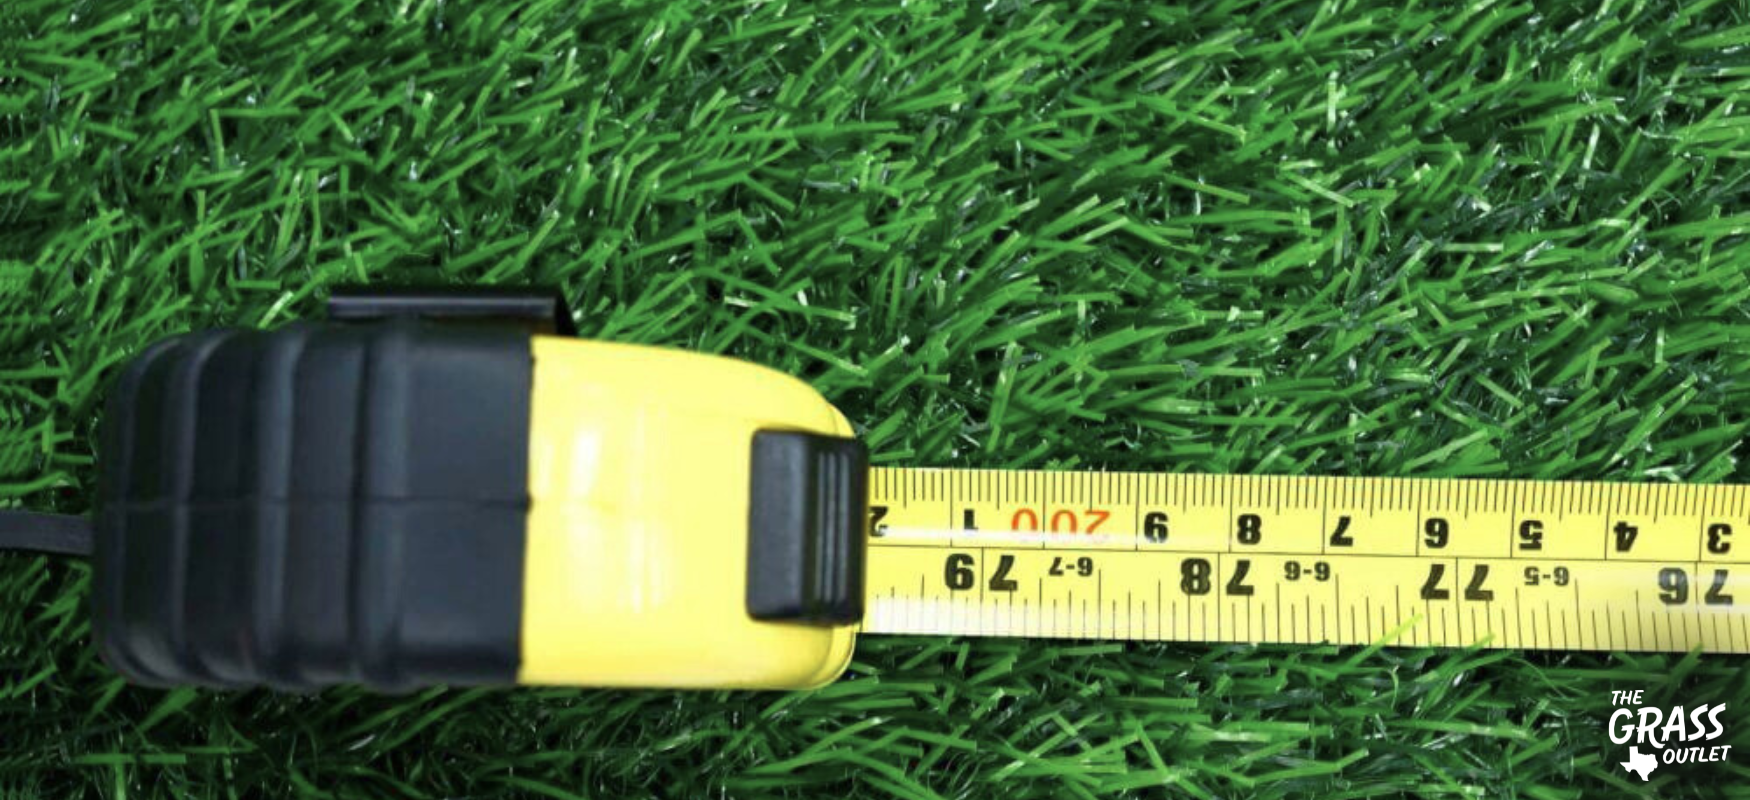
Getting it Right: Measuring Your Lawn
Accurately measuring your lawn space is crucial for effective lawn care and planning. It ensures that you purchase the correct amount of products, such as sod, fertilizer, and grass seed, preventing both waste and shortfall.
You’ll need a few essential tools: a measuring tape or wheel, stakes, and a long string or rope. Start by walking around your lawn, measuring each section.
- Measure the length and width of rectangular or square areas, then multiply these numbers to find their size.
- For irregularly shaped lawns, divide the area into smaller, more manageable shapes, like rectangles, squares, or triangles, and calculate the area size of each before adding them up.
Precise measurements are essential when ordering sod. Knowing the exact area ensures that you order the right amount, reducing the risk of running out or having too much leftover. When dealing with sod, it’s a good practice to add an extra 5-10% to your total measurement to account for cutting and fitting during installation.
One effective method for irregularly shaped areas is to divide the lawn into smaller sections. Measure each section’s length and width, and use formulas appropriate for the shapes involved (like the area of a triangle or trapezoid). For curved areas, measure the longest width and length to get a rough estimate, then refine your calculation by dividing the area into more precise segments.
Tip: Several online tools and apps can simplify this process. Apps like Google Earth or specific lawn measurement tools can help you draw and measure your lawn using satellite images. These tools are handy for large or complex lawns, providing approximate measurements that can be easily saved and referred to later.
Laying the Groundwork: Soil Grading
The Importance of Topsoil for Lawn Health
Landscape Topsoil provides a nutrient-rich environment that supports robust grass growth and enhances soil structure. High-quality topsoil contains essential organic matter and nutrients that promote root development and improve the soil’s ability to retain moisture. However, the landscape topsoil mix should contain 50% sandy or chocolate loam or more and no more than 50% compost. Too much compost can burn the new grass’s roots and leaves.
Best Practices for Applying Topsoil and Leveling
Begin by removing all vegetation, such as old grass, using a sod cutter. Next, use a rototiller to cultivate at least 2-3 inches of the existing soil. Break up larger clumps and remove rocks and other large debris. Using a shovel or topdressing spreader, apply a layer of topsoil—about 2 to 3 inches inch thick—over your lawn.. Ensuring you have about 6 inches of well-cultivated ground and nutrient-rich topsoil is vital to a healthy, drought-tolerant lawn.
Next, use a rake or a lawn leveling tool to smooth the topsoil. It ensures that the topsoil is evenly distributed and fills any low spots, creating a level, properly graded surface. After spreading the topsoil, lightly water the area to help the soil settle and integrate with the existing soil.
How to Grade Your Lawn for Proper Drainage
Proper soil grading is essential for adequate lawn drainage and overall health. Grading creates a gentle slope that directs water away from buildings and prevents water from pooling in low-lying areas. Start by identifying any high or low spots in your yard. These irregularities can be caused by natural topography or previous landscaping efforts.
Once you’ve identified these areas, use a landscaping rake to level them out. Adding or removing soil as needed will help create a uniform slope. A slope of about 2% (a 2-foot drop over 100 feet) is recommended for most lawns to ensure adequate drainage. Proper grading prevents water from accumulating, leading to root rot and other lawn health issues.
Planting and Establishing Your Lawn
Quick Steps to Planting Zoysia, Bermuda, and St. Augustine Grasses
Zoysia Grass is best planted from spring through fall, though you can install it year-round. Begin by preparing the soil, ensuring it is loose and debris-free. Plant the grass pieces seam-to-seam in a brick pattern without overlapping the edges. Water the grass and go over it several times with a sod roller to ensure good root-to-soil contact. Keep the soil consistently moist until roots establish, which typically takes 14-21 days. Once the grass reaches about 3 inches, you can begin mowing.
Bermuda Grass thrives in full sun and is usually planted year-round. Prepare the soil by tilling and leveling it. Begin by preparing the soil, ensuring it is loose and debris-free. Plant the grass pieces seam-to-seam in a brick pattern without overlapping the edges. Water the grass and go over it several times with a sod roller to ensure good root-to-soil contact. Keep the soil consistently moist until roots establish, which typically takes 14-21 days. Once the grass reaches about 3 inches, you can begin mowing.
St. Augustine Grass is best planted from spring through fall, though you can install it year-round. Begin by preparing the soil, ensuring it is loose and debris-free. Plant the grass pieces seam-to-seam in a brick pattern without overlapping the edges. Water the grass and go over it several times with a sod roller to ensure good root-to-soil contact. Keep the soil consistently moist until roots establish, which typically takes 14-21 days. Once the grass reaches about 3 inches, you can begin mowing.
Preparing the Soil for Each Grass Type
For Zoysia Grass, ensure the soil is well-drained and enriched with organic matter. Remove any existing vegetation, loosen the soil to a 4-6 inches depth, and level it. Amending the soil with compost can improve fertility and drainage, though you must till the compost into the soil deeply to avoid burning the new roots.
Bermuda Grass prefers well-drained soil with a pH between 6.0 and 7.0. Remove any debris and existing grass and till the soil to a depth of 6 inches. Adding sand or compost can enhance soil texture and fertility, which supports Bermuda grass’s vigorous growth. However, you must till the compost into the soil deeply to avoid burning the new roots.
St. Augustine Grass requires well-drained soil with good fertility. Clear the area of weeds and debris and till the soil to a depth of 6-8 inches. Adding organic matter like compost or peat moss can improve soil structure and nutrient content, providing an ideal foundation for the sod or plugs. However, if you add compost prior to planting, you must till the compost into the soil deeply to avoid burning the new roots.
Watering and Fertilization Requirements During Establishment
Water lightly several times daily to keep the soil consistently moist during establishment. Once roots have established, you can reduce watering frequency but increase the amount of water per session to encourage deep rooting. After the grass starts growing actively, apply a slow-release nitrogen fertilizer.
Laying It Down: Sod Installation
Step-by-Step Guide to Sod Installation
- Soil Preparation:
- Clear the Area: Remove any existing grass, weeds, rocks, and debris. Use a sod cutter for large areas to strip away the old lawn and create a clean base.
- Test and Amend the Soil: Conduct a soil test to determine pH and nutrient levels. Based on the test results, amend the soil by adding lime or sulfur to adjust pH if necessary and incorporating compost or other organic matter to improve fertility.
- Till and Level the Soil: Till the soil to a depth of 4-6 inches to loosen compacted areas and improve drainage. Level the area with a rake, ensuring a smooth, even surface without low spots where water can collect.
- Laying the Sod:
- Start Along a Straight Edge: Begin laying sod along a straight edge, such as a driveway or sidewalk, and work your way across the lawn. Lay each piece tightly against the next without overlapping or leaving gaps.
- Stagger the Seams: Lay the sod in a brick-like pattern, staggering the seams to prevent erosion and create a more seamless appearance.
- Cutting Sod Pieces: Use a sharp knife or sod cutter to trim the sod pieces to fit around curves, edges, and obstacles. Make sure the pieces fit snugly without overlapping.
- Post-Installation Care:
- Water the newly laid sod immediately after installation to ensure the soil beneath is thoroughly soaked. Continue to water daily for the first two weeks to keep the soil consistently moist but not waterlogged.
- Mowing: Avoid mowing the new sod until it has firmly rooted into the soil, typically around 2-3 weeks after installation. When you mow, set your mower to a higher setting to avoid cutting too much grass at once.
- Fertilization: Apply a starter fertilizer designed for new sod about four weeks after installation. Follow the product instructions carefully to avoid over-fertilizing, which can damage the grass.
- Traffic: Minimize foot traffic on the newly installed sod for the first few weeks to allow the roots to establish securely. It helps prevent the sod from shifting and ensures proper root development.
Watering Your Lawn: Irrigation Essentials
For newly planted lawns, consistent moisture is essential until the grass is well-established. Newly seeded or sodded lawns require frequent, light watering to keep the topsoil moist. For the first two weeks, you should water the new sod daily, ensuring the water penetrates the soil to a depth of about 6 inches. After the initial establishment period, the frequency can be reduced.
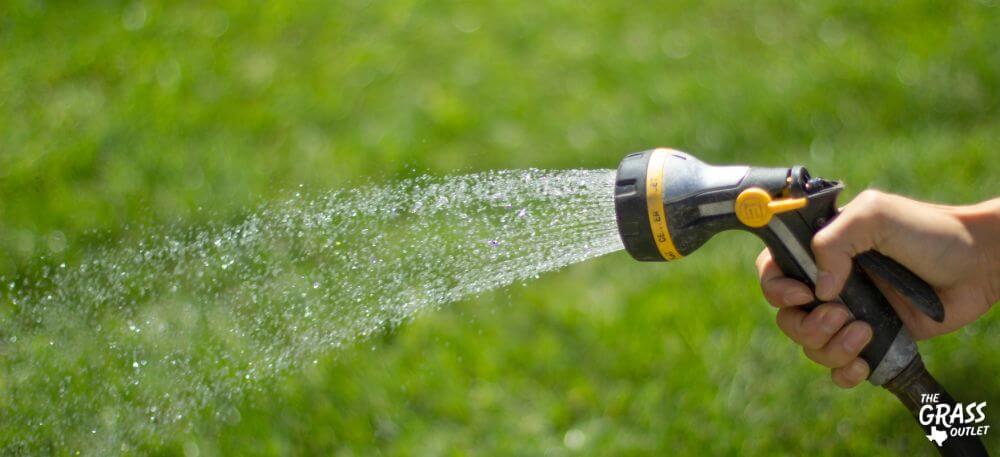
The amount of water your lawn needs depends on your location and the time of year. For example, areas with frequent rain and mild weather require less irrigation than desert regions or places with extremely hot summers. Generally, lawns need about 1 to 1.5 inches of water per week. This amount can be significantly reduced in cooler climates or when there’s substantial rainfall.
The best time to water your lawn is between 6 a.m. and 10 a.m. This timing ensures that water can soak into the soil before the day’s heat causes evaporation. Avoid watering during the peak sun hours (10 a.m. to 4 p.m.) and late at night, as these practices can lead to mold growth.
To water your lawn effectively, aim to water thoroughly three times a week for about 20 minutes each session. This deep watering encourages the roots to grow deeper, enhancing the lawn’s drought resistance and overall health.
Installing an irrigation system can significantly simplify lawn watering and ensure even coverage. When installing an irrigation system, it’s essential to plan the layout to cover all lawn areas uniformly. Choose the correct type of sprinkler heads—rotary sprinklers for larger areas and spray heads for smaller, intricate spaces. Including a rain sensor to prevent overwatering and conserve wateris also beneficial.
Maintaining an irrigation system involves regular checks for leaks, clogs, and misaligned sprinkler heads. Periodically adjust the sprinkler heads to ensure they are watering the intended areas without waste. Also, seasonal adjustments are necessary; for instance, less frequent watering may be required during spring and fall compared to the peak summer months.
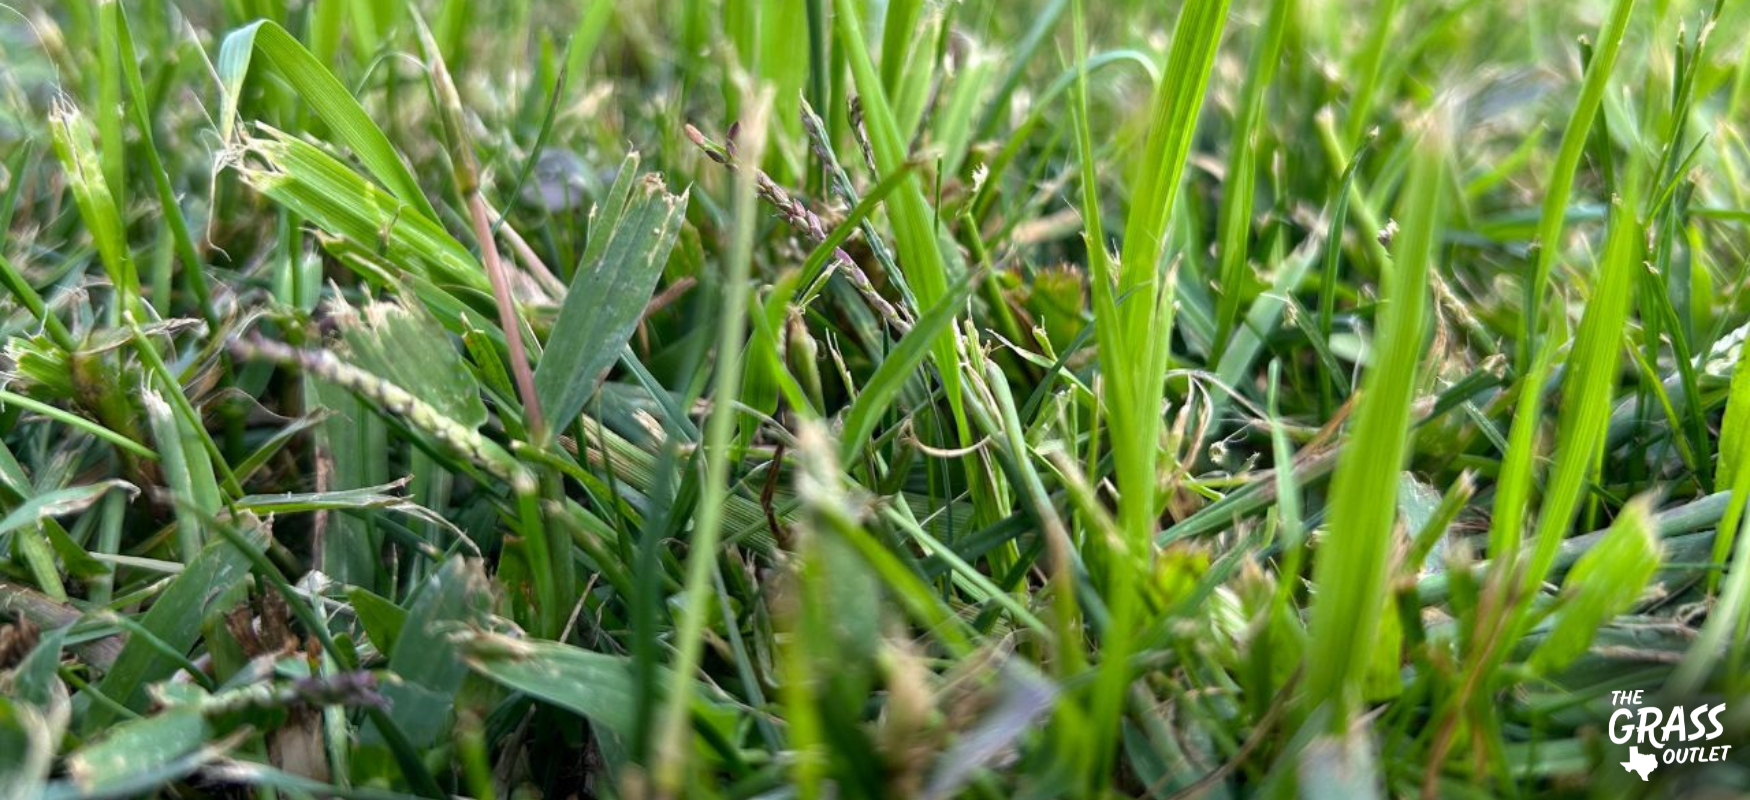
Weed Control: Keeping Your Lawn Pristine
Weeds are a common nuisance for homeowners, as they can quickly overrun a lawn and compete with your grass for nutrients, water, and space. Effective weed control is essential to maintain a healthy and beautiful lawn. Lawns typically contain three types of weeds: broadleaf, grassy, and grass-like.
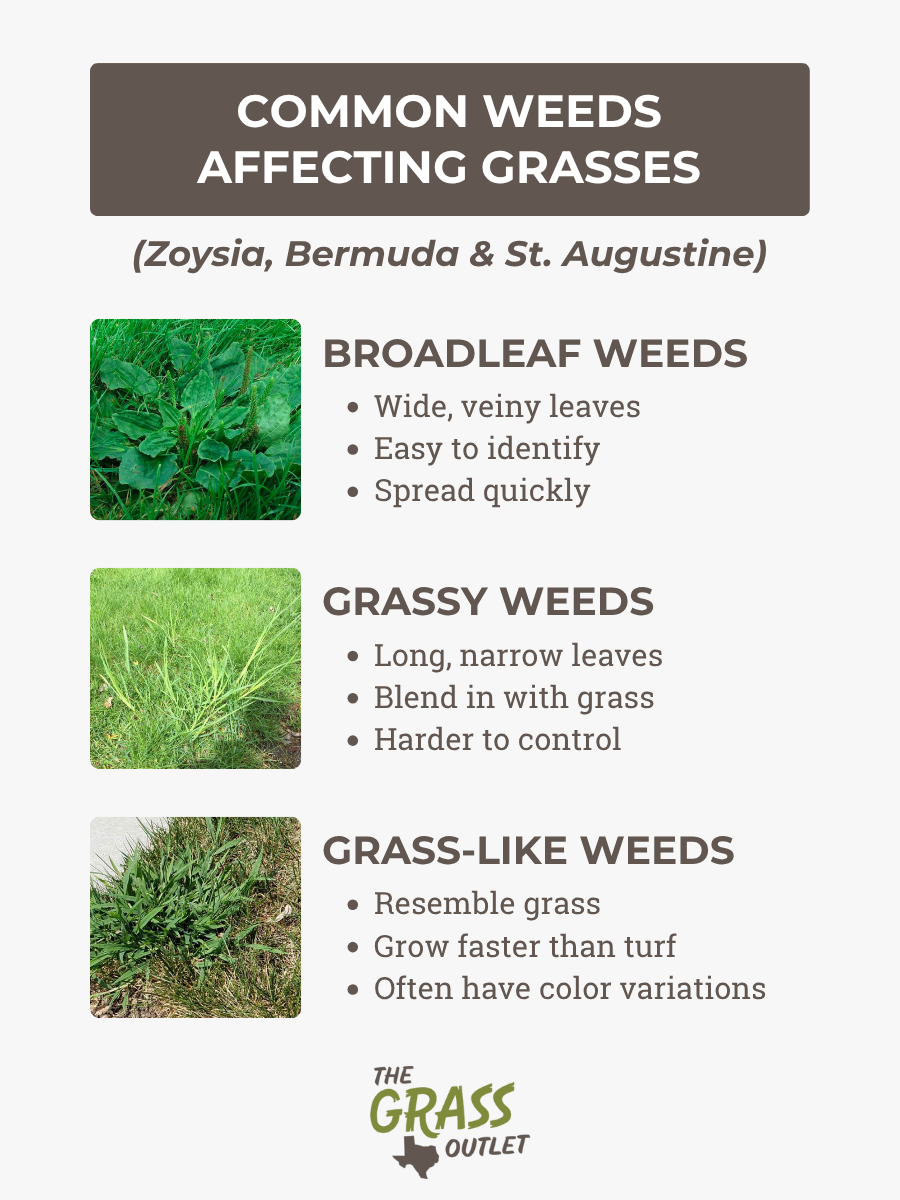
Common Weeds Affecting Zoysia, Bermuda, and St. Augustine Grasses
- Broadleaf Weeds, such as dandelions, clover, and chickweed, are characterized by their wide, veiny leaves. These weeds are easily identifiable and can quickly spread if not controlled. They are commonly found in all types of lawns, including Zoysia, Bermuda, and St. Augustine grasses.
- Grassy Weeds, like crabgrass and foxtail, have long, narrow leaves with parallel veins. They blend in with grass and can be difficult to distinguish, making them challenging to control once established. Due to their similar appearance, they often infest Bermuda and Zoysia lawns.
- Grass-like Weeds, such as sedges and wild onions, resemble grass but grow faster and have different colorations. They are prevalent in St. Augustine lawns and can be particularly troublesome because they thrive in conditions similar to the grass.
Pre- and Post-Emergent Weed Control Options
Pre-Emergent Weed Control: Pre-emergent herbicides are applied to the soil before weed seeds germinate, creating a barrier that prevents the weeds from establishing. These herbicides are effective against annual weeds like crabgrass and are best applied in early spring and fall. Everyday pre-emergent products include dithiopyr and pendimethalin.
Post-Emergent Weed Control: Post-emergent herbicides target weeds that have already emerged and are actively growing. These herbicides are available in both selective forms, which target specific types of weeds, and non-selective forms, which kill all vegetation. Glyphosate is a popular non-selective herbicide, while 2,4-D is commonly used for broadleaf weed control.
Feeding Your Grass: Fertilizing for Growth
The Role of Fertilization in Grass Health
Fertilization is critical to maintaining a healthy lawn, as it provides essential nutrients that promote vigorous growth, robust root systems, and a vibrant green color. Vital nutrients in fertilizers include nitrogen (N), phosphorus (P), and potassium (K).
- Nitrogen is vital for leaf growth and color.
- Phosphorus supports root development.
- Potassium enhances overall plant health and disease resistance.
Consistent and appropriate fertilization ensures your lawn remains resilient to pests, diseases, and environmental stresses.
Recommended Fertilizers and Application Schedules for Zoysia, Bermuda, and St. Augustine
Zoysia Grass benefits from a balanced fertilizer with a high nitrogen content, typically with an NPK ratio of 15-0-15 or 16-4-8. Fertilize Zoysia four times a year: early spring, late spring, early summer, and late summer. Apply about 1 pound of fertilizer per 1,000 square feet. Using a slow-release fertilizer like Milorganite or Scotts Turf Builder is ideal, as these products provide steady nutrition over time and are less likely to burn the grass.
Bermuda Grass requires frequent feeding due to its vigorous growth. Use a nitrogen-rich fertilizer with an NPK ratio of around 21-7-14 or 16-4-8. Fertilize Bermuda grass every 6-8 weeks during the growing season, applying about 4-6 pounds of nitrogen per 1,000 square feet annually. A slow-release fertilizer helps maintain steady growth and reduces the risk of over-fertilization.
St. Augustine Grass thrives with a balanced fertilizer, such as 15-5-10. Fertilize in early spring, late spring, and fall. Apply 1-2 pounds of nitrogen per 1,000 square feet per application. Avoid fertilizing during the cooler months to prevent fungal diseases. Nitro-Phos and Scotts Southern Turf Builder are excellent choices for St. Augustine lawns.
Organic and Chemical Fertilizer Options
Organic Fertilizers are derived from natural materials like compost, worm castings, manure, and bone meal. They release nutrients slowly, improving soil health over time and reducing the risk of nutrient runoff. They are particularly beneficial in gardens where chemical use is minimized and safe for use around children and pets.
Chemical Fertilizers provide a precise balance of nutrients tailored to specific grass types. These fertilizers often act quickly, offering an immediate boost in growth and color. While effective, they require careful application to avoid over-fertilization and potential environmental impact. These fertilizers suit lawns needing quick improvement or dealing with specific nutrient deficiencies.
Year-Round Lawn Care: Quick Seasonal Tips
Maintaining a lush and healthy lawn requires year-round attention, with specific seasonal law care tips tailored to each season. By adjusting your watering, mowing, and fertilizing practices according to the time of year, you can keep your lawn looking its best and prepare it for seasonal changes.
Spring
Key Maintenance Tasks:
- Aeration: Relieve soil compaction and improve air and water flow to the roots.
- Dethatching: Remove excess thatch to promote healthy grass growth.
- Overseeding: Fill in bare spots to ensure a thick, uniform lawn.
Seasonal Adjustments:
- Watering: Start watering as temperatures rise. Ensure deep watering to encourage root growth, typically once or twice a week, depending on rainfall.
- Mowing: Begin mowing when the grass reaches 2.5 to 3 inches. Maintain a higher cut initially to encourage deeper roots.
- Fertilizing: Apply a balanced, slow-release fertilizer to give your grass the nutrients it needs for strong spring growth.
Follow these spring lawn care tips to keep your lawn healthy and vibrant throughout the season, ensuring strong root growth, even coverage, and lush green grass.
Summer
Key Maintenance Tasks:
- Weed Control: Apply post-emergent herbicides to tackle summer weeds.
- Pest Management: Monitor for pests like grubs and treat them accordingly.
- Watering: Ensure consistent watering, especially during dry spells.
Seasonal Adjustments:
- Water deeply and less frequently, typically one inch per week. Water should be used early in the morning to reduce evaporation.
- Mowing: Mow regularly to maintain grass at a height of about 2.5 to 3 inches. Avoid cutting more than one-third of the grass blade at a time.
- Fertilizing: Use a slow-release fertilizer to provide steady nutrition without burning the grass. Avoid fertilizing during extreme heat to prevent stress on the lawn.
Fall
Key Maintenance Tasks:
- Aeration: Aerate the soil to alleviate compaction and enhance root growth.
- Overseeding: Plant new grass seeds to fill thin areas and promote a dense lawn.
- Leaf Removal: Regularly rake or mulch leaves to prevent them from smothering the grass.
Seasonal Adjustments:
- Watering: Continue watering until the ground freezes, ensuring the lawn goes into winter well-hydrated.
- Mowing: Gradually lower the mowing height to about 2 inches to prepare for winter. Keep mowing until the grass stops growing.
- Fertilizing: Apply a high-potassium fertilizer in late fall to strengthen the grass for winter and promote early spring green-up.
Winter
Key Maintenance Tasks:
- Debris Removal: Keep the lawn free of debris, such as fallen branches and leaves, to prevent mold and diseases.
- Foot Traffic Minimization: Avoid walking on frozen grass to prevent damage.
Seasonal Adjustments:
- Watering: Water sparingly if needed, particularly in regions with dry winters. Ensure any watering is done on warmer days to prevent ice formation.
- Mowing: Stop mowing as the grass goes dormant. Ensure the last cut before winter is short enough to prevent matting but not too short to stress the grass.
- Fertilizing: Avoid fertilizing during winter dormancy, as the grass is not actively growing and cannot effectively utilize the nutrients.
Common Lawn Concerns and Solutions
Common Pests and Diseases Affecting Zoysia, Bermuda, and St. Augustine Grasses
Zoysia Grass:
Pests: Zoysia is susceptible to chinch bugs and mole crickets. Chinch bugs suck the sap from grass blades, causing yellow patches, while mole crickets tunnel through the soil, disturbing roots.
Diseases: Common diseases include brown patches and rust. Brown patches appear as significant, circular brown patches, while rust manifests as orange spores on the grass blades.
Bermuda Grass:
Pests: Armyworms and grubs are frequent issues. Armyworms chew on grass blades, leaving bare patches, and grubs feed on roots, causing the grass to wilt and die.
Diseases: Bermuda grass is prone to dollar spot and spring dead spot. Dollar spots show small, sunken spots with white fungal growth, and spring dead spots appear as circular dead patches.
Augustine Grass:
Pests: St. Augustine is commonly affected by chinch bugs and white grubs. Chinch bugs cause irregular yellow patches, while white grubs result in spongy turf that can be lifted easily.
Diseases: It often suffers from gray leaf spots and take-all root rot. Gray leaf spot shows gray lesions on leaves, and take-all root rot causes yellowing and thinning of the grass.
How to Identify and Treat These Issues
Identification:
Pests: Look for visible insects, signs of feeding (chewed blades, sap-sucking damage), and abnormal turf texture or color.
Diseases: Check for specific symptoms, such as spots, patches, discoloration, and fungal growth on grass blades and roots.
Treatment:
Pests: Use appropriate insecticides, such as carbaryl for chinchbugs and imidacloprid for grubs. Biological controls, such as beneficial nematodes, can also help manage pest populations.
Diseases: Fungicides like azoxystrobin and propiconazole are effective against fungal infections. To reduce disease incidence, ensure proper lawn maintenance practices.
Preventative Measures for a Healthier Lawn
- Proper Mowing: Maintain appropriate mowing heights for each grass type to reduce stress and vulnerability to pests and diseases. For instance, keep Zoysia at 1-2 inches, Bermuda at 0.5-2 inches, and St. Augustine at 2.5-4 inches.
- Adequate Watering: Water deeply but infrequently to encourage profound root growth. Avoid watering in the evening to reduce disease risks associated with prolonged moisture.
- Fertilization: Use balanced fertilizers to provide essential nutrients without over-fertilizing, which can promote disease. Follow recommended schedules and amounts based on soil test results.
- Thatch Management: Regularly dethatch to prevent excessive thatch buildup, which can harbor pests and diseases and impede water and nutrient penetration.
- Aeration: Aerate the lawn annually to relieve soil compaction, improve root growth, and enhance water and nutrient absorption.
Conclusion
A beautiful lawn requires consistent and dedicated lawn care and maintenance. One key aspect is understanding how to achieve a beautiful lawn through proper mowing, watering, and fertilizing.
Knowing how to care for new grass is essential for those looking to establish it. It includes:
- Carefully prepare the soil.
- Selecting the correct type of grass seed.
- Ensure proper watering techniques are used during the establishment phase.
It’s also beneficial to follow specific tips for a great lawn, such as aerating the soil to improve air circulation and nutrient absorption and promptly address any pest or disease issues. By integrating these practices into your routine, you can enjoy a healthy, beautiful lawn that enhances the aesthetic appeal of your property.