How to Lay Sod
You’ve tested your soil and ordered the right sod for your property. You’ve also added a layer of topsoil for depth and raked the entire surface of the site to rid it of stones and large dirt clods.
Then the sod arrives…do you know what to do next? Here is a quick how-to guide for laying sod in a way that ensures success.
- Lightly sprinkle the area with water to dampen the soil and prepare it for the sod.
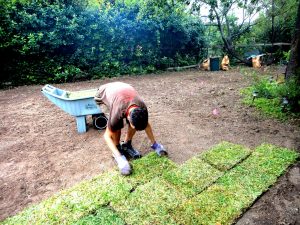
- Find the straightest edge in your yard, and start there. (If you do not have a straight edge, tie a string between two posts to use as your guide.) Lay the first row of sod from one end to the other, keeping as straight a line as possible. Pat down each individual piece as you go, smoothing out any wrinkles or air pockets. Avoid stretching the turf.
- Continue to lay the rest of the rows, staggering the pieces in a brick wall fashion. Lay each row snugly against the one before it (but not so much that they overlap); this will make the seams less noticeable.
- Use a sharp sod cutter to create pieces that will fit along plant beds or other paved areas.
- After installation is complete, water the lawn thoroughly. New sod is thirsty for water. Check out our watering lawn guide for more info on this essential step.
- Fill a rented sod roller with water (for weight) and go over the lawn several times. This promotes turf-to-soil contact and a smooth, even appearance.
More tips for laying sod:
- It’s optimal to lay and water sod in the morning.
- Keep feet off the sod while laying it as much as possible. Gently rake out any footprints.
- Do not use small cuttings at edges of the lawn; use them in the middle instead.
Laying sod is the best and fastest way to enjoy a lush green lawn this spring. Check out our products page to get started on yours.