Grass Turning Yellow
Discoloration Is Resolved With Prompt Planting & Watering
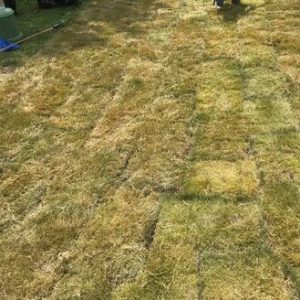
Grass is a living product, and discoloration post-harvest is an ordinary sign of transplant shock. When the grass is harvested, its root system is severed, and it can no longer access water, nutrients, and o2 from the earth. Yellowing grass, especially during the hottest months, is not uncommon and does not indicate unhealthy grass. You must plan appropriately to ensure that all the grass is planted & watered promptly on your delivery day.
Ambient Temperatures Affect Coloring
Grass discoloration will vary depending on ambient temperatures, time of year, sod variety, etc. Yellowing is more common and severe when ambient temperatures are 85°F & hotter, and inevitable when temps are 90°F+. However, if you install & water the grass promptly on the delivery day and follow the appropriate irrigation schedule based on the weather, irrigation method, sprinkler head type, and 5 S’s (species, season, soil, sunlight/shade), your grass should begin to bounce back within the first week or two post-planting.
Full Recovery & Healthy Establishment
As long as you irrigate properly with enough water to deeply saturate the soil 6 inches daily, you should notice new green leaves emerging on your lawn within 3-7 days. Depending on the weather, yard conditions, and 5 S’s, your new grass should establish deep roots and begin growing/filling in within 3-6 weeks when watered & cared for properly. Please note that grass will also yellow during the fall as it transitions into winter dormancy.
Yard Conditions & Weather Affect Green-Up Rate
Please note that some areas may take a little longer to green up fully. The rate of green-up will depend on various factors, such as differing yard & soil conditions and the weather. For instance, grass installed in full sun, near hardscaping & concrete, at the tops of slopes, on compacted or dense soil, etc., may take longer than grass planted in partial sun. Be sure to monitor areas taking longer to green up, as the slow bounce-back could indicate an issue such as malfunctioning sprinkler heads, water runoff, poor soil infiltration, drainage problems, etc.
Please review our Irrigation article, and use it as a reference when planning for the appropriate irrigation schedule & duration based on differing yard & soil conditions, irrigation methods, sprinkler heads, etc. Be advised that achieving deep soil saturation daily is critical during root establishment.
Blade-Curling Commonly Leads To Misidentification
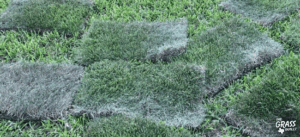
When grass begins to dry out post-harvest, the moisture loss causes the blades to curl, shrink, or fold. This causes the grass leaves to look thinner than usual. You will likely notice some discoloration & dullness as well. When a customer contacts us concerned that we’ve delivered the incorrect variety or worried that some of their grass is contaminated with weeds or another grass cultivar, it is almost always due to blade-curling.
Very Common During Ambient Temperatures 80°F+
This is one of the most common causes for concern on the day of delivery, especially when ambient temps are 80°F+. It is also a typical characteristic of transplant shock that is quickly resolved once the grass is promptly installed & deeply watered in on the delivery day – Often within a day or two during milder temperatures.
Most Common With Zoysia Varieties
Blade-Curling is more noticeable in Zoysia cultivars, especially Palisades Zoysia. The extent of blade curling can vary depending on various factors, such as ambient temperatures, wind speeds, farm maintenance schedule, and harvest time. For example, the first pallet harvested will stress more than the last one because it will sit on the pallet a little longer. Also, the pieces on the top layer will dry out more. It is not unusual for these blocks to take longer to bounce back from blade-curling & discoloration. That said, the pieces on the top layer are extra pieces we added because of this.
We Always Deliver Grass Within 24 Hours of Harvesting It
Not to worry, though, as we only harvest our grass fresh by the order the day before delivery, and we will never allow it to sit long enough to affect its long-term health. As long as the grass is promptly installed & watered in on the delivery day and appropriately irrigated daily while it establishes, the leaves will swell to their regular width with the increased moisture & reduced stress. Full green-up & root establishment should occur within the first 3-6 weeks, depending on the weather, season, soil condition, and irrigation schedule.
Ripped & Misshapen Blocks
Bermuda Is A Two-Handed Install Variety
Although we strive only to harvest thickly cut grass blocks that are consistently the same size and shape, some environmental factors can occasionally cause some blocks to be less than perfect. Some varieties, such as Bermuda, naturally do not block well. These cultivars are referred to as “two-handed install” varieties.
High-Volume Can Dull Harvesting Blades
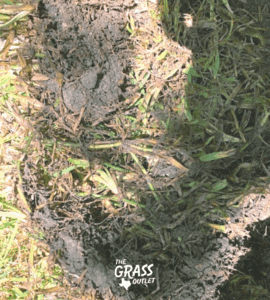
When harvest volume is exceptionally high, our harvesting equipment blades may dull quicker than usual before the end of each harvest day. Unfortunately, duller blades can cause irregular cuts, rips, and dirt loss. Further, when soil is lost, the roots & rhizomes can become more visible.
Missing Soil Does Not Affect Root Establishment
Most hybrid sod cultivars grown in Texas are rhizomatous & stoloniferous, meaning they are reproduced using these plant parts. When sprigging or planting turfgrass fields, farmers use special machinery to cut grass sections into smaller pieces or remove the sod stolons. These plant parts are then dropped onto areas of well-cultivated topsoil for grass. Planting grass using exposed plant parts is very successful on turfgrass farms, even when no dirt is attached to the roots, rhizomes, and stolons, and as long as the topsoil is well-cultivated.
Don’t Waste Viable Grass!
We understand that installing blocks of this nature by hand is not ideal; however, misshapen blocks, missing dirt, and exposed roots will not affect the health of the grass. Healthy, usable grass is often impetuously scrapped during installation because the blocks are not perfect cuts. Ultimately, the size & shape of grass pieces is irrelevant to aesthetics, as the grass will grow into the seams if cared for properly, regardless of size & shape. Please note that it is always good practice to have extra topsoil on-hand on the delivery day to build up the ground as needed, maintain a level install area, and encourage healthy root establishment.
Magic Formula
Although there is no such thing as magic, you can rest assured that all of the concerns discussed above will be resolved once the grass is promptly installed & watered. Be advised that you must follow an irrigation schedule appropriate to the weather & your yard conditions throughout the establishment period. With proper watering your lawn & good cultural practices, the grass will “magically” green up & establish healthily within the first 3-6 weeks, depending on the weather. Please note that the green-up & growth rate will depend on various cultural practices & environmental factors, such as:
- Weather
- Ground prep
- Season
- Soil type & condition
- Maintenance schedule
- Traffic
- Yard conditions
- Irrigation schedule & method
- Grass cultivar
- Sunlight conditions
- Cultural practices
Pro Tip:
It is best to set aside smaller and misshapen pieces and use them for your yard’s gap fill-ins and oddly shaped areas. Doing this will save you time in the long run because you will not have to cut as many blocks to fit into these spaces. Cutting into the dense clayey soil, roots, and vegetation can be strenuous and time-consuming. So, having some smaller, misshapen blocks can be a plus, if not too excessive! If you believe that you received excessive grass in this condition, don’t hesitate to contact us on the delivery day by filling out our online concern submission form.
Delivery Day Tips:
- Have extra topsoil on hand to build up areas as needed.
- Do NOT use compost or Dillo Dirt! Instead, opt for a loam-compost mix.
- Loosen the topsoil with a landscaping rake before beginning the installation.
- Document any concerns you have with photos as you complete the installation.
- The top layer of each pallet is extra grass that often dries out & discolors more. Look at the grass a few layers down for a better idea of the grass’s condition.
- Do not treat the topsoil or new grass with high-nitrogen or fast-release fertilizers.
- Clear the driveway so the driver can drop the pallets with his forklift.
- Thoroughly review all of our Grass Care articles before delivery.
What You’ll Need:
- Landscaping Rake
- Sharp Tool – Such as a machete, sod knife, garden edger, etc.
- Sod Roller
- Irrigation System or Garden Hose with Hose-End Sprinkler
- Extra Loam Topsoil
- Wheel Barrow (for transporting grass)
- PPE – Such as landscaping gloves, long-sleeved clothes, long socks, boots, etc.
While not common, there occasionally might be some ants or other insects in the grass, which is grown outdoors in a rural, coastal area. Usually, ants will only get into the few top layers of the pallet(s). This is more common during heavy rainfall, as the ants seek higher ground. Please document the issue with a video if your grass is heavily infested throughout the pallet on the delivery day. Most insecticides can be applied safely to the grass during or immediately after the installation is complete. There are also effective natural options, such as beneficial nematodes. You can submit a concern on the delivery day by completing our concern submission form.

