How to Cut Sod – Guide and Tips
Introduction
Sod cutting, the process of cutting a layer of grass and the part of the soil beneath it, is a common practice in landscaping and gardening. There are several reasons for undertaking this process. One of the most frequent reasons for sod cutting is to establish a new lawn or to renovate an existing one. Sod cutting allows for the rapid establishment of a yard, in contrast to seeding, which takes longer to grow. This makes it ideal for laying high-quality grass sods like Zoysia grass, Bermuda, or St. Augustine grass, available from The Grass Outlet, to instantly enhance your lawn’s appearance and health.
This process also creates or modifies garden designs. It allows for the precise shaping of grassy areas, facilitating the creation of clear lines and defined spaces within a yard’s design.
When weeds or pests damage a lawn, sometimes the best solution is to start over. Sod cutting then removes the thatch, along with the weeds and pests, providing an opportunity for a fresh start with a new and healthy lawn. In situations where the soil quality is poor, sod cutting offers direct access to the soil and its improvement before laying a new lawn or planting.
Sod cutting is often the first step in planned construction projects. Whether it involves building new structures, laying pipes, or installing patios, removing grass is necessary to access the soil.
Sometimes, moving grass sod to a different area is a reason for cutting. It can be within the same yard or a completely different location where you need to cover soil immediately. It is common in large-scale landscaping projects or areas where erosion control is a priority.
Where and How Can Cut Sod Be Used?
The use of cut sod is versatile in various landscaping projects, ranging from private home gardens to large public parks. It is highly flexible in design, and you can use it in different environments and soil types.
Beyond its aesthetic and practical uses, sod plays a crucial ecological role. It significantly contributes to carbon sequestration, air purification, and temperature regulation. A healthy lawn can make your surroundings more pleasant by capturing carbon dioxide, releasing oxygen, and cooling the area.
Unlike seeding, which has specific requirements and procedures depending on the season, you can lay sod almost any time of the year, provided the ground is not frozen. This flexibility allows sod companies to complete landscape projects over a broader timeframe.
If pests, disease, or intense use damages a lawn, cutting and replacing those areas is an effective way to rejuvenate it. Inserting sod is much quicker compared to seeding and waiting for new grass to grow.
If you have been considering sod cutting and are curious about the necessary steps, the following text will provide you with details of the entire process.
How to Prepare an Area Where Sod Will Be Cut or Removed
The key to efficient sod cutting is preparation. If you take the time to properly prepare the area for cutting, it will go smoothly and with little effort, and you will also prevent unintended damage to the property.
A few days before the planned sod cutting, thoroughly water the area, which will soften the soil, making it easier to cut. It must be moist but not overly watered. If there is too much water, it will be counterproductive and will cause the process to be more complex and messy. The key is in the right amount of water.
When marking the area for cutting, use water-based paint or lime spray. This step is essential for precision, ensuring you cut only the intended areas.
Before cutting, remove everything from the lawn – pots, toys, furniture, and debris. Raking can be beneficial for debris removal.
Identifying and marking any obstacles in the planned area, such as sprinkler heads, utility lines, or large rocks, is necessary. It is crucial to avoid damaging these elements during sod cutting.
Call the utility marking service if you suspect there are water or sewage pipes. In many places, you can dial 811 for this service. They will mark the location of these utilities so you can avoid them.
If you notice that the grass is long, mow it to a shorter height, which will make the sod-cutting process easier.
What follows is the selection of the appropriate tool – manual or machine. The choice depends on the area and specific lawn conditions.
Manual Tool – Square Sod Cutter: When It Is Best to Use It
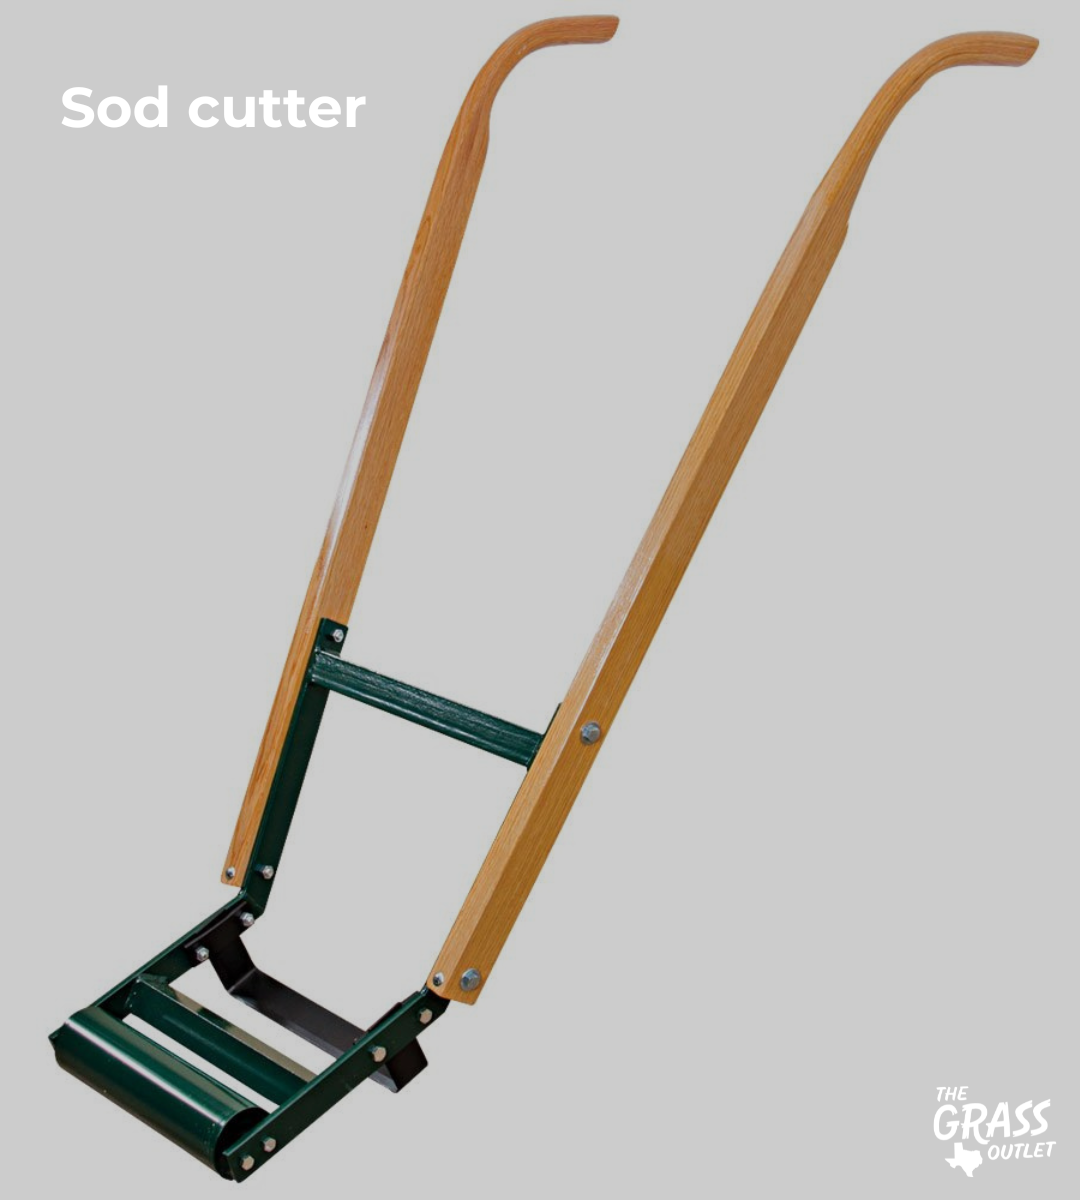
Sod cutter is typically used for smaller lawn areas or areas where precision is required. It is considered an excellent tool for shaping the edges of a lawn. It requires physical effort but is perfect for tight spaces.
Usually, it has a long handle and a crossbar for foot pressure, with a sharp, horizontal blade at the bottom.
Tip for Use: Use your foot to press the blade into the ground at an angle, then use the handle to rock the cutter back and forth, cutting a strip of sod, which you can then roll up and remove. A drawback of this method is that the surface can often be uneven after its use, so you should do leveling. Therefore, having a certain amount of soil to level the area is essential.
Motorized Sod Cutting Machine: What Are the Advantages
A motorized sod cutter is suitable if your lawn is significantly large. It can operate on gasoline or electricity.
These machines feature a horizontally oscillating blade and are self-propelled. They often have adjustable settings for cutting depth. The machine is guided along previously marked lines, cutting the sod, which you can then roll up.
It saves time and effort, especially in large areas. It provides more consistent cutting and is less physically demanding than a manual cutter.
As for additional equipment and tools needed for sod cutting, these include:
- Garden hose or irrigation system: For pre-watering the area to soften the soil.
- Lawn mower: If the grass is long, mowing it to a shorter height before sod cutting can make the process easier.
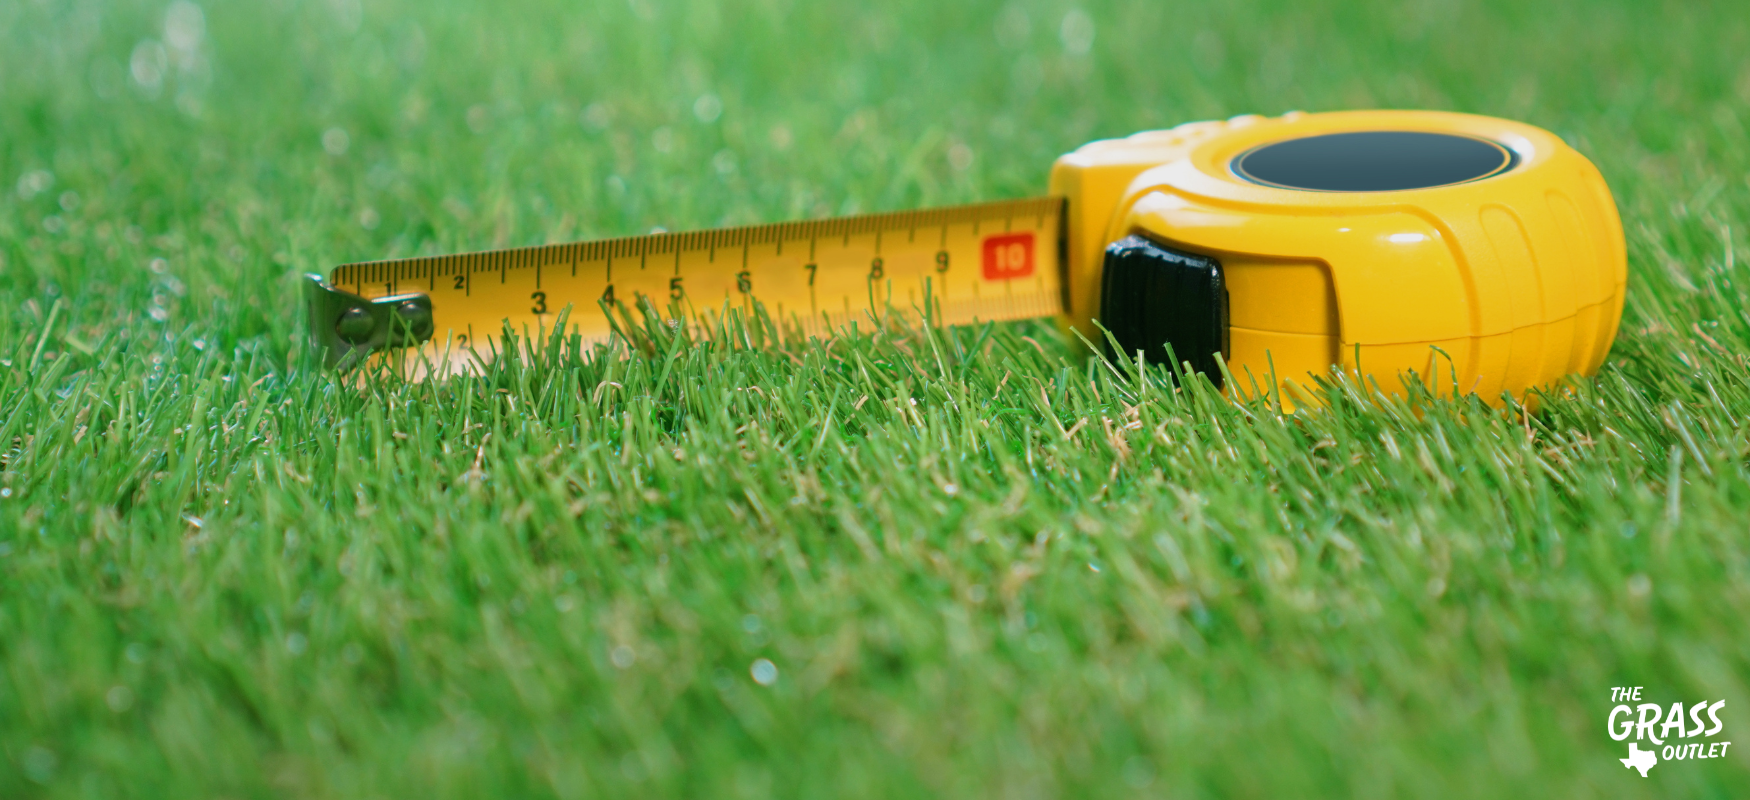
- Tape measure and marking paint: For precise measuring and marking of the area.
- Rakes and shovels: For cleaning after the sod is removed and preparing the soil for the subsequent use.
- Wheelbarrow: Useful for transporting removed sod, soil, or debris.
- Cutting knife: Handy for cutting the sod into manageable parts or sizes, especially if using a manual cutter.
- Work gloves and safety goggles
How to Measure and Mark the Area for Sod Cutting
To properly execute sod cutting, create a sketch of the area on paper, which helps visualize the space and makes it easier to calculate the amount of sod needed.
Consider trees, flower beds, or pathways that will affect the new sod placement if you still want a lawn in that area. Sometimes, property owners might want something different – a garden or a seating area setup.
Start by measuring the length and width, using a tape measure as your first tool. Multiply the length by the width to get the square footage. It is crucial to know how much sod you’ll need to purchase later if you plan to replace it with new sod.
If an area is irregularly shaped, divide it into smaller rectangles, measure them, and then add up the areas.
Place stakes at the corners of the area and stretch a string or rope between them to outline the space. Use spray paint or chalk to mark lines along the string.
Always measure twice to ensure accuracy. Any measuring error can lead to a shortage or excess of sod, which can be costly and time-consuming to correct. Before cutting or removing any existing grass, review your plan and measurements. Make sure everything aligns with your landscaping goals.
Once the area is measured and marked, you can proceed with soil preparation, which includes clearing debris, leveling, and improving the soil, if necessary. If you plan to form a new lawn after cutting and want to order sod, it’s advisable to purchase a bit more sod (about 5-10%) to compensate for grass in irregularly shaped parts of the lawn – corners and curves.
Tip: Remember, precise measurement and careful planning are essential to successful sod placement. It ensures efficient use of resources and time and significantly contributes to your landscaping project’s aesthetic and functional outcome.
How The Process of Cutting Sod Looks Like – What Are the Cutting Techniques
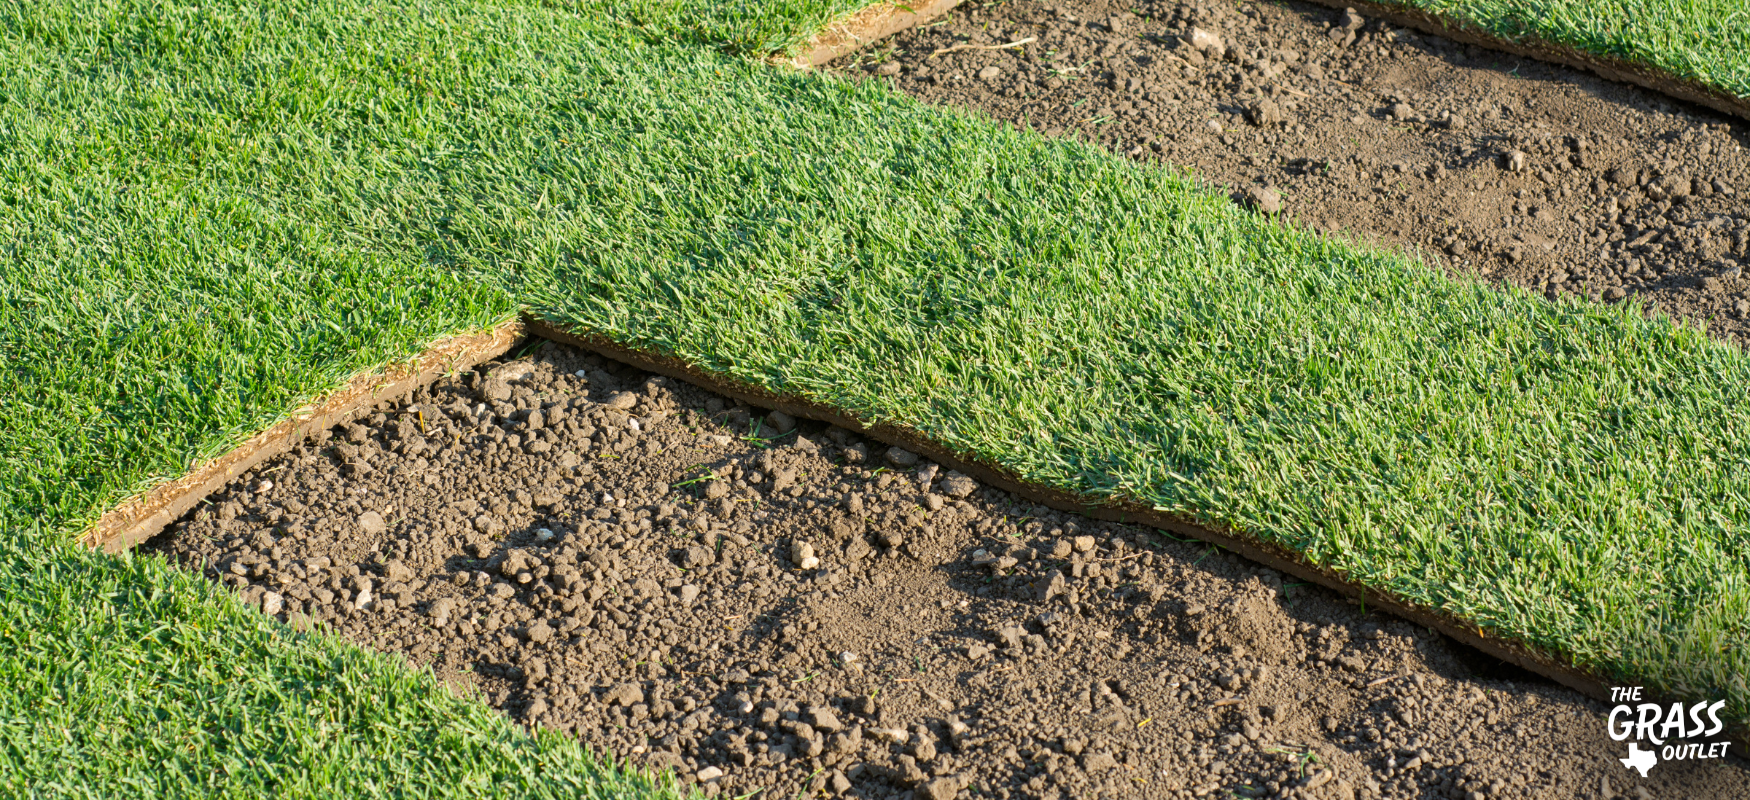
Cutting the sod in sections is useful for easier removal and lifting of cut pieces, for instance, up to about 2 feet1.5 meters in length and 1 inch30 cm in width. Cut along these lines, and it will be easier to remove the sod. Of course, these dimensions can vary as the size of the sections depends on the total area you plan to cut.
The process begins by inserting the cutter into the grass at a 45-degree angle to a depth of up to 6 inches (15 cm). Withdraw the cutter, reinsert it next to the initial insertion point, and guide the cutter along the marked line. Keep the cuts straight and of uniform depth.
After cutting the sod along the planned lines, both lengthwise and widthwise:
- Start sliding a shovel under the cut surface at an angle to separate it from the lower soil layer.
- Gently lift and roll up the sod strips for further transport.
- If the grass is for transplanting, be careful not to break the rolls.
You can also cut sod with self-propelled machines that run on gas or electricity. They are beneficial for larger areas that need to be trimmed.
It is recommended that the cutting depth be between three-quarters of an inch to one inch. It ensures enough soil and preserved roots, and the strips won’t be too heavy to remove. However, if you want to transplant the cut sod to another location, the cutting depth can be greater, up to 1.5 inches or deeper.
With machines, the cutting process starts by activating levers, starting the machine and blade, and then proceeding through the planned area. Ensure the cutting depth is adequate. Continue the cutting process at a low speed. When you finish a specific strip, lift the mower handles to push the blade down, as this will separate the sod strip, then roll it up, making sure the soil side is outwards to prevent damaging the grass.
How to Use Cut Sod
You might be wondering how to utilize the cut sod, so here are a few ideas:
- Composting: Sod contains organic matter that can be useful for composting. However, it’s essential to compost sod correctly to avoid issues like regrowth of grass. You should first dry out the sod, then layer it with other composting materials, grass side down. Over time, it will decompose and enrich the compost.
- Creating new or enhancing existing grass areas: If you plan to plant grass in other parts of your yard, you can transplant the removed sod there. It is a great way to reuse sod and improve different parts of your lawn.
- Garden paths or raised beds: You can use sod can for lining garden paths or the bottoms of raised beds. The grass side should face down; over time, it will decompose, adding nutrients to the soil.
- Erosion control: Sod can also be used in erosion-prone areas. By placing sod in these areas, you can help stabilize the soil and prevent further erosion.
- Donation: Consider donating usable sod to community projects, schools, churches, or neighbors in need. Always ensure the sod is in good condition before offering it for donation.
How to Cut Sod on Uneven Terrain?
You should consider all these factors before beginning the sod-cutting process when dealing with lawns that are not entirely flat but have slopes and unevenness and with trees with substantial root systems.
For slopes or uneven terrain, use a sod cutter that is easy to maneuver and has good stability. Self-propelled models are often more suitable for such terrain.
On slopes, it is usually safer and more efficient to cut sod horizontally across the slope rather than up and down. Uneven terrain may require frequent adjustments in cutting depth to ensure uniformity of sod strips and to avoid cutting too deeply or shallowly.
Proceed slowly and be cautious, especially on slopes, as uneven terrain can be unpredictable. Wear appropriate protective gear, including boots with good traction, to reduce the risk of slipping or losing control of the equipment.
Remember that removing grass on a slope can increase the risk of soil erosion. It is advisable to replant or protect the exposed soil quickly.
Obstacles Along the Way
If you encounter rocky areas or roots, adjust the blade to a shallower depth to avoid directly hitting them. Reduce speed when approaching known obstacles. It gives you more control and time to react if the sod cutter hits something hard.
You can stop the machine and manually remove rocks to prevent damage to the cutter. If the space is tight and there are obstacles, use a manual cutter for more control.
It’s advised to regularly check and maintain the cutter, as hitting rocks or roots can dull the blade, requiring more frequent sharpening.
Safety Tips
Although it may seem simple, you should approach the process of sod cutting with care, with particular attention to ensuring personal safety to avoid injuries.
This activity combines the art of gardening with physical labor. It involves using sharp tools and strenuous physical activity, potentially posing various risks. You must equip yourself with appropriate protective gear and adhere to best practices to minimize these risks.
- Wear protective clothing. Long pants and long-sleeve shirts can protect your skin from cuts, scrapes, and potential irritations caused by grass.
- Protective footwear: Wear sturdy, closed shoes or boots with good grip to protect your feet and ensure stability on uneven ground.
- Gloves: Use durable gloves to protect your hands from sharp tools and rough sod. Gloves also provide a better grip.
- Eye protection: Safety glasses protect your eyes from flying debris, dust, and other particles.
- Be aware of your surroundings: Ensure the area is free from trip hazards, and be mindful of your proximity to other people, especially when using cutting tools.
- First aid: Always have a basic first aid kit nearby in case of minor cuts or injuries.
- Check weather conditions: Avoid working in extreme weather conditions, such as heavy rain or intense heat, which can increase the risk of accidents.
- Find the proper storage for tools: After using, clean and properly store tools to prevent accidents and prolong their lifespan.
And speaking of tools – never underestimate the importance of proper handling. Improper use or handling of sod-cutting tools can lead to severe injuries.
Proper Handling of Sod-Cutting Tools
The first step should be a thorough reading of the operating manual. Following the recommended instructions for tool use ensures compliance with safety standards, especially in professional environments.
Only start cutting once you fully understand the process and steps, and of course, do it with appropriate equipment and in suitable weather conditions.
If we’re talking about using a new machine or tool for the first time, it’s likely correct, sufficiently sharpened, and ready for immediate use. Each subsequent use will require regular tool maintenance, ensuring it operates as expected. A dull blade or faulty equipment makes the task harder and increases the risk of accidents because they require more force or can behave unpredictably.
Proper handling of tools also includes using them in an ergonomically correct way. For example, using a sod cutter at the right angle and appropriate height reduces strain on the body, minimizing the risk of musculoskeletal injuries.
If you misuse tools, there’s a higher risk of losing control, leading to accidents. Proper handling ensures that you have complete control over the tool, which is particularly important when cutting through tough sod or working on more demanding and uneven terrains.
Care and Maintenance After Cutting – How to Prepare the Area for the Next Use
Once you remove the sod, the next step is preparing the area for its subsequent use, whether it’s planting a new lawn or other landscaping projects.
- Soil testing: Before new planting or laying sod, it’s recommended to test the soil. It will provide information about its pH value, nutrient levels, and composition. Adjusting the soil’s pH value and nutrient content might be necessary for new plants or grass growth.
- Clearing the area: Remove all grass, roots, or debris remnants.
- Tilling the soil: Tilling the soil to a depth of at least 3 inches10-15 cm helps aerate it, improve drainage, and break up compacted earth, making it easier for new roots to penetrate.
- Adding amendments to the soil: Based on the soil test, you may need to add compost, manure, peat, or lime to improve the soil’s structure, fertility, and pH. However, high-nitrogen products should not be used when replanting the area with new sod, as our grass will already contain high levels of nitrogen.
- Leveling and raking: Level the soil to prevent water pooling and ensure even new grass or plants grow. Proper raking is also crucial for adequate drainage.
- Compacting the soil: Lightly compact the soil to eliminate large air pockets, but avoid over-compacting, which can hinder root growth and drainage.
- Watering: Before laying new sod or planting, water the area to settle the soil and provide a moist base. This step is vital for root establishment.
- Laying new sod or planting: If laying new sod, ensure it is without gaps and water it immediately. For planting, follow specific guidelines, considering plants’ light, water, and soil needs.
- New sod care: For new sod, frequent watering is alwaysoften a priority in the first weeks. For new plants, mulching can be beneficial for retaining moisture and regulating soil temperature.
- Maintenance: Regular maintenance, including fertilization, watering, and weed removal, will be necessary to establish and maintian a healthy new lawn or garden.
Tools Care
Regular tool maintenance is essential to ensure your tools serve you well over time so each sod cutting is efficiently done.
- Clean tools after use: It’s vital to remove soil, grass, and debris from tools after each use. It prevents rust and keeps tools in good condition. For motorized equipment like sod cutters, wipe the exterior and remove grass that may be stuck in blades or moving parts.
- Sharpen blades regularly: A dull blade makes cutting difficult and can damage the grass. Regularly sharpen the blades of manual cutters, edgers, or other cutting tools to ensure clean and efficient cuts.
- Lubricate moving parts: Apply lubricant to all moving parts to ensure smooth operation. It is crucial for tools with hinges, wheels, or other moving parts during use.
- Inspect tools regularly: Check your tools regularly for signs of wear and tear. Look for bent or broken parts, loose components, or other damage. Repair or replace parts as needed.
- Remove rust: If rust occurs, remove it with a wire brush or sandpaper. After removing rust, protect metal surfaces by applying a thin layer of oil.
- Store tools in a dry, protected place: This helps prevent rust and damage.
Conclusion
In summary, sod cutting is a vital practice in landscaping and gardening due to its ability to provide immediate lawn establishment, erosion control, weed suppression, soil quality improvement, aesthetic enhancement, damage repair, design flexibility, ecological benefits, and seasonal adaptability. These features make sod a popular choice for both residential and commercial landscaping projects.
Knowing how to properly use and maintain your tools likely results in completing the task more efficiently and in less time.
Remember, experts like those at The Grass Outlet are always available to provide timely advice on sod cutting.